Showing posts with label Kossel. Show all posts

Sunday, 2 May 2021

Remote Power Control Update

Remote Power Setup from last time
     There's been some changes to the remote power setup from last post, so I've documented the updates here if anyone wants to duplicate this modification. It's primarily a hardware change but there has also been a software update to the OctoPi plugin that can be a bit confusing for new users.

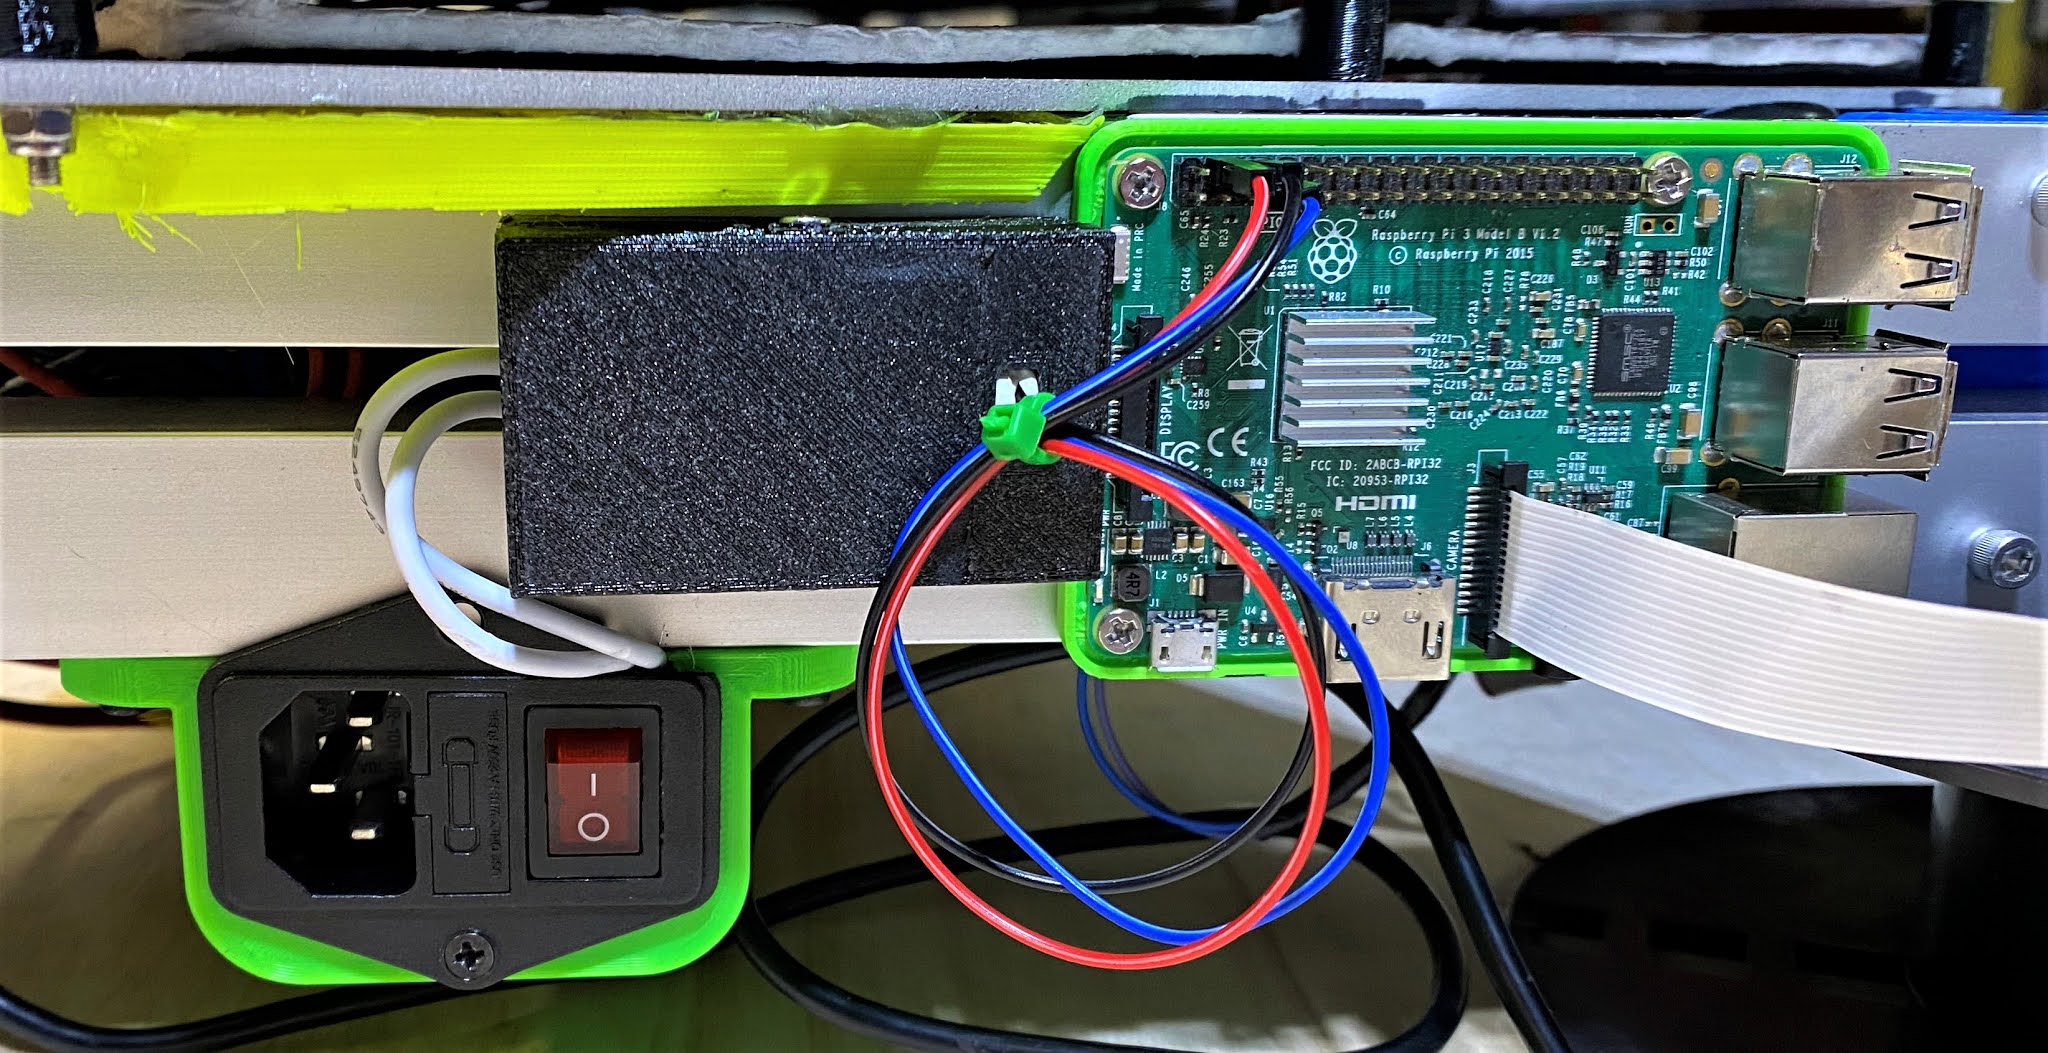
     The hardware side has changed over to a proper Raspberry Pi Hat, mainly due to the relay from last-time glitching out once the temperature in the workshop went from 10°C average to around 20°C, something about that slight increase made the relay trigger current increase past the Pi's current output limits. This isn't covered in the data sheet for the 'JQC-3FF-S-Z' relay that I've been able to find, so your results with that relay may vary depending on the environment the printer lives in. I've upgraded to the Keyestudio 4 Channel Relay Hat which uses relays that actually play nice with the Pi's onboard current limits, installing it was almost plug-in and go, only needing to screw the load lines into the terminal blocks to finish hardware installation.

Updated Settings for PSU Control

     On the software side, the creator of the 'PSU Control' plug-in did a major overhaul of the code-base in April, end result was it splitting into 3 plug-ins. The original which is now basically the switching logic for when to turn things on/off. And a pair of support plugins that act as interfaces for Raspberry Pi GPIO or TPlink smart plugs so far. Functionally this means that the 'Switching' settings need to be set to 'Plugin', and then the 'PSU Control RPi.GPIO' plugin installed via the plugin manager.

PSU Control RPi.GPIO settings

    Configuring the new plugin is fairly simple, it's really just a matter of telling what pin-mapping mode and which pin is in use for the printer relay. I'm using what the plugin calls 'BCM' mode, identifying the pins by the logic name instead of the more common 'Board' mode since it seems to be slightly more reliable. For the hat I'm using, the relays are on BCM pins 4, 6, 22, and 26. Setting up is just a matter of putting in the number for the relay in use, 4 in my case, and setting the logic to inverted since I've wired the printer as 'normally closed' and the plugin assumes the more common and generally safer 'normally open' logic by default. That concludes my follow up on this subject, next time its going to be looking modernizing an old relic from the early days of RepRap based printing.

Sunday, 1 March 2020

Yearly Overhaul: Mega Kossel

Mega Kossel
       One year after building the Mega 2.0, some of the reused components started to wear out and cause issues, so this is an overview of what's been updated and replaced over the past couple of months, primarily the print-bed and its related wiring along with some worn out cables in a couple areas.

Mini Kossel Power Switch after overload surge
     The first issue that came up was the original power switch overheated and partially melted due to an improperly matched circuit breaker from an old refit allowing sustained over-current during the heat-up cycle at the start of a print, I think that's what happened anyway. Fortunately the fix was very simple, one of these IEC Socket with Switch and Fuse Holder units and a 5A glass fuse from the local electronics store, and some wire from an inexpensive extension cord covered the electrical side. Mounting the new plug was mostly a matter of designing a custom bracket for it to sit in and bolting that to the underside of the frame, then connecting everything to the power supply and that issue was fixed.


New power socket wired up and ready for mounting shell
Power Socket installed in printed housing for safety


      With the power input repaired, the second and more critical issue that came up was a mechanical failure of the original heat-bed power input cable where it was soldered to the Kapton heater disk. Re-soldering it worked temporarily but it broke a second time in the exact same spot and the second break ripped a hole in the copper layer of the circuitry, so it was time to retire the old thing and get a more solid MK3 bed variant to do the job.

New heat-bed stack components, from left to right:
spare aluminum, cotton insulation, 300mm MK3 bed, and Creality magnet kit
     Parts used in the new bed are basically the larger versions of the ones installed on the Sculptor and Ender 3. A 300mm MK3 aluminum bed is the electrical and structural core, with a sheet of cotton insulation to protect the electronics bay taped on the back. Upper surface is coated with the magnet sheet out of a Creality magnetic bed kit to mount the existing spring-steel sheet bed surface. I'm not using the Creality upper surface since they have a tendency to crack and breakdown after a fairly short usage lifetime.

New bed supports installed on Mega
     Of course, the change in bed shape means that a new set of bed supports are needed, some quick CAD work with the design files had the relevant parts drawn out and sent off to the Ender 3 and Sculptor for fabrication. Once that was done and bolted down, it was time to solder the electrical cables onto the new bed since it didn't come with the wires pre-installed, so here's some soldering in low-temperatures 101.

MK3 bed positioned on Ender 3 print surface for easy soldering.
     It was freezing cold out when this refit was done, workshop was just under 5°C average temperature, so the solder wasn't heating up correctly on the workbench or iron. Seems that solder needs about 20°C to work correctly, so I flipped the bed I was working on upside-down on my Ender 3's build-plate after cranking it up to 60°C. This managed to transmit enough heat into the parts being worked on to get things flowing correctly and it was fairly simple to finish installing after that.

Wednesday, 26 June 2019

Part Review: TMC2208 Stepper Drivers

MKS TMC2208 Stepper Driver
      During a recent maintenance session on the Mega Kossel, I installed some TMC2208 stepper drivers into the X/Y/Z sockets to replace the original drivers. Below is a short guide on how to install them on a printer board, along with my impressions after a month of use on a primary production printer.

Ramps 1.4 with TMC2208 drivers on main motion axis
    As you can see from the above picture, these drivers are meant as drop-in replacements for the popular A4988-series that the majority of 3D printers use by default, so upgrading to them works mostly the same way on any control board with plug-in drivers. The key to getting them socketed properly is to line up the pin marked 'EN' or 'Enable' with the same corner of the board socket, it's usually marked on the board, but for the Ramps-series it's the corner pin closest to the power input, centre top in the picture above. The other main change needed is to pull the third jumper in the step selector, make sure to do this before installing the driver since that pin is different between the A4988 and TMC2208 pin-outs.


    The most noticeable difference upon starting a print is just how quiet the printer is, there's barely any sound other than the actual belts moving and the cooling fans, quiet a difference from the A4988 drivers. They also have some nice effects on print quality, prints made before the upgrade had a slight ripple effect that was from minor vibrations shaking the nozzle slightly, those have been vastly reduced with the TMC2208 drivers installed.

3DBenchy post installation,
     This is the #3DBency being printed in the video clip, as you can see the ripple pattern is still present but vastly reduced, so I'm quite happy with the end result of the upgrade, minor stringing aside, I'll probably update my other printers with them eventually as well. In conclusion, are TMC/Trinamic drivers worth it? Yes if you want to make the printer drastically quieter without redoing the motor mounts or are looking to maximize print quality. 

Tuesday, 1 January 2019

Mega Kossel Upgrade: Direct Drive Effector with Titan Aero

Titan Aero Heat Sink
     Happy New Year! Over December 2018 I was experimenting with flexible filament, 90A TPE specifically, and ran into issues with running it on the Mega Kossel, so I decided to upgrade the extruder to full direct drive to correct the issue. I've had an old Titan clone in my parts bin since 2016, so the logical route to go was upgrading to the E3D Titan Aero with a pancake stepper motor.


Motor and Titan body mounted to modified Ultibots effector
     While I was waiting for the parts to arrive I started looking for an effector design to mount it on. The Ultibots D300 series design files turned out to have what I needed, but it was meant for some specialized type of rod-arm joint. Pulling the source files into Fusion 360 made it easy to customize both the effector and part-cooling duct. The remixed files are on Thingiverse (thing:3321195).


Titan Aero Volcano 90% installed
    Once the effector was sorted out, it was simply a matter of following the Titan assembly instructions to get it mounted and mostly assembled. Getting the drive gear in is probably the hardest part, it kind of has to be slid in sideways before the motor is installed, I ended up using the screw that connects the motor and extruder body to hold the body in place during that step. The idler arm is the other tricky bit, you need to slide it into its slot before installing the motor, otherwise it's a pain to mount, I ended up sliding it in at an angle and snapping it over the end of the motor shaft, not the best way to mount that bit.


Cooling fans installed, Noctua 4010 on the left, 40x40 radial on the right
    With the mechanical side of stuff assembled, it was time to mount the fans and sort out the electrical side of things. For the main heat-sink fan, I decided to get one of the much vaunted Noctua fans to see what all the fuss was about. The difference going from a 3010 axial fan for the heat-sink to the Noctua is instantly noticeable on initial power up, the 30mm fan was loud enough that I could always tell if the printer was on when in the workshop, the Noctua is completely silent by comparison, I can't even hear it unless I'm right next to the effector to clean the nozzle, so I'm probably going to replace all my constant on fans with them over time. Installing the part fan is slightly odd, there is one short screw to connect the fan duct to the effector that goes in first, then the fan gets slotted in and bolted down, the top hole needs a longer screw since it doubles as the second connector to the effector.


Wiring nest under the print-bed
    The last bit of installation was figuring out why the pancake NEMA17 wasn't working. Plugging in the working wire from the old extruder just resulted in the motor sitting there and making noise, so I thought one of the coils might be connected backwards or something. Digging into the documentation, it turns out that 25mm NEMA 17 motors have the coil pinouts reversed relative to longer models, so I had to use some jumper lines to build a cross-over cable to fix the issue, it's the black/grey/yellow/orange set of wires in the picture above.


Mega Kossel ready to print

Thursday, 30 November 2017

Flying extruders and Deltas, Round 2

Mini Kossel and Mega Kossel with Flying Extruders
     Back in February, I tried installing a flying extruder on my Mini Kossel, didn't work out very well because one of the carriages would randomly slip during the first few layers of a print and suddenly it was air-printing and making a complete mess. So I switched back to the normal extruder configuration and kept it that way until I built the Mega Kossel

Mega Kossel Flying extruder V2
    For this version I decided to use elastic bands to hold everything in place, worked a bit better but still hit the same issue of random carriage slips. After watching it do this a couple of times I realised that the root cause was the extruder assembly's inertia damping the carriage movement and overwhelming the motor on the tower, causing the drive belt to slip on the pulley and produce the effect I'd been seeing. At that point I was just trying to get the new printer working, so I striped the flying extruder components off and set things up for a conventional long Bowden system. Further research into Kossel design was obviously needed to sort out what the solution to the issue was.

34mm (left) & 48mm (right) NEMA 17 stepper motors
    It was while building the Sculptor that I finally figured out the issue, it was the NEMA17/34mm steppers that were originally part of my Mini Kossel kit that were the root cause of the problem. Like most ~$300 kits, it had fairly light stepper motors for powering the motion mechanics, and while they were sufficient for normal use, I'd found some old forum posts that recommended longer NEMA17/48mm steppers for use on delta printers, and indeed I'd followed that advice when building the Micro Kossel in the first place, so I did a motor transplant and installed the 48mm motors on the Mega Kossel. The difference was quite noticeable once I powered it up and homed the effector. With the original motors it was possible to shake the effector about 3mm sideways even with the motors powered up, with the new ones the effector felt like it was glued in place, zero wobble or shake that I could detect. 
Mega Kossel Flying Extruder V2
    I used the Mega in that state until early November, then decided to try the flying configuration again. Surprisingly, it worked perfectly even without the counterweight that I'd used in the previous versions so I decided to stay with this version for the foreseeable future. 
Mega Kossel with flying extruder

Monday, 18 September 2017

Stress Testing the Mega Kossel: Building C. Laimer's Tourbillon Watch

Tourbillon Clock
     After the painting project from last time, I decided to try building a more mechanically complex project, Christoph Laimer's Tourbillon Watch (thing:1249221). It's a very complicated model with very tight printing tolerances, all the parts need to be as close to perfect as possible or the clock won't work properly. 


Printing the mainspring pinion gear on the Mega Kossel
     Obviously the first step in this project was lots of printing, about 100-120 hours in total, perfect for shaking out any glitches in the printer. Aside from a couple of spaghetti incidents caused by the print bed shifting on it's mounts, actually printing the parts was the easiest part of the project, tracking down compatible screws was the hardest part, I ended up reaming most of the screw holes to accept M2 screws since those were the closest that I could find.


Clock parts organized for assembly with mainspring being assembled
Mainspring clamped for assembly with printed machine vise
    Actually building the clock took a few days, the virtual walkthrough and assembly videos were invaluable for this stage, always making it clear what part was installed next at every step of the process.


Mainspring fully installed with outer casing in place
Clock parts set out for assembly
   I ended up using some 14-gauge wire cut to length for the gearing axles, long needle nose pliers are crucial for installing them in the upper center plate. Other tools I used were a 3/64-inch drill bit for reaming the gears mounting holes and a Philips screwdriver for the M2 screws. After a couple of days work I had it assembled and mostly working, one of the gears is a bit sticky on its axis, but it's mostly complete.


Test fitting Clock face components
Completed Tourbillon Clock

Tuesday, 8 August 2017

Supersizing a Kossel Mini

Mini Kossel

     This time I'm upgrading the printer I started out with, a basic Mini Kossel kit, to a larger and taller frame. After replacing the original wheels with steel wheels last year, the aluminum towers finally wore down to the point that one of the carriages basically fell off the tower.


2020 Aluminum extrusion after running steel wheels for 14 months
     The obvious choice for replacing the damaged towers was OpenBuilds V-slot, same outer dimensions as the original extrusions allowing reuse of the printed frame parts. I also ended up swapping the steel wheels with the Delrin versions, don't want a repeat of what happened to the old towers.


Enlarged upper triangle


Enlarged lower triangle


     Since I was upping the size of the frame anyway, I cut the old towers down into new sides for the bottom triangle, the idea was to allow for mounting the power supply under the bed with the rest of the electronics, as well as allowing for upgrading the build plate in the future. Dimension wise, the side rails are now 30 cm long, allowing for anything up to a 25cm build plate. Reassembly was mostly the same as the original build process, just scaled up by a large margin.


Upgraded frame
     I did learn some new tricks to make assembly more precise, probably the most useful was using a spare section of extrusion to set the end-stop height to exactly below the upper triangle. All that's needed for this trick is a 3-inch C clamp, a spare or unused piece of the extrusion and the end-stop assembly.


The simple way to set endstop height


     Once the frame was rebuilt, the other parts that needed replacement were the rod-arms, the originals were both too short for the new size and one was cracked after a rather spectacular malfunction last fall. For the new rod-arms, the parts list is quite simple, 12 Traxxas 5347 joints (Amazon.ca), 6 12" lengths of 8-32 threaded rod, an 8-32 tap and AndrewBCN's assembly tool (Thingiverse, thing:701248). The 8-32 tap is optional, it just makes assembly easier by pre-cutting the first couple turns of the thread in the Traxxas joints.


Parts for new rod-arms with completed arm
     With the new rod-arms done, the next step was reinstalling the electronics and print bed. Since I'm not replacing the current print bed, some new mounts were needed, along with a new mounting bracket for the Re-ARM/Ramps boards. After creating a Fusion 360 mock-up of the bottom triangle, it was fairly easy to design new mounting brackets for the print bed, the Re-ARM was even simpler since the manufacture provides a cad file of the boards physical layout. The resulting STLs are here for download.


Re-ARM and electronics installed
Power supply mounting bracket
Mounting bracket installed on power supply

     As you can see, the power supply ended up under the bottom triangle, just wasn't space for the control boards otherwise. The brackets I've designed for mounting the power supply are in with the other STLs above, you'll need to mirror file with your slicer program to get both the left and right versions. Only other parts needed for mounting are some M4x20mm screws and the power supply, I'm using this one, but the brackets should work for any similar module.


Print bed installed with dust covers
     One of the recent improvements for deltas that's been trending on the net lately is adding protective covers to the corners over the lower pulleys and electronics bay. I've been meaning to add them for a while and came up with a simple way to make them out of some spare foam core.


Kossel on foam core for tracing
Kossel and Print bed outlines on foam core
     Yep, that's it, just stick the printer on the foam core and trace around the base with a marker. I also used an earlier version of the print bed supports to center it under the printer frame and then traced it out as well. After that it was just putting the printed parts in their approximate spots, trace the outlines and then cut out the section that's left. I did use a drill to put 3 holes in each for ventilation over the motors but that was basically it. last step was wrap the edges with electrical tape for safety and colour the top black for aesthetics.


Corner covers finished and installed

      Now, obviously the power supply is currently serving as the structural base for the entire frame, not the best idea for long term stability or noise. I found these tennis ball feet (thing:2158108) on Thingiverse, they're printable adaptors that let 3 standard tennis balls serve as vibration damping feet, so I used the Micro Kossel to print a set and installed them.
Tennis ball feet 2/3 installed
   And that was pretty much it, only things left to do were recalibration running a few test prints which turned out nicely.
Completed Mega Kossel

Sunday, 12 February 2017

Experiments with Flying Extruders and Deltas

Mini Kossel with flying extruder
     Not long after finishing the Re-ARM upgrade, my geared extruder suffered a failed bowden coupler, so rather than reprint the entire thing, I decided to switch to an alternate configuration that I'd read about called a 'flying extruder', basically suspending the extruder motor over the effector/hot-end, allowing for better print quality with a wider range of materials.


MK8 extruder with suspension bracket attached
     I started by replacing the failed extruder with a MK8 variant that was in my spare parts pile, then tracked down one of the designs for the suspension mounts from Thingiverse (thing:1295606). It's a fairly good starting point, but it is missing a couple of parts for mounting on a standard Kossel frame, so I had to design some custom parts for the pulley mounts, the files are here.


Moving extruder power cable to the effector wire harness
Heat-damaged PLA fan duct skirt
     One unexpected issue cropped up during the process of changing the Bowden tube, which on an E3D Lite6 requires a full stripdown and rebuild, so I had to remove the lower half of the effector I've been using (thing:1569106) and found that part of the hot-end had rotated and melted part of the lower half of the effector. My solution was to rework part of the design and add a small loop on one side to allow use of a zip-tie to secure the heater wires, thus locking the rotation and preventing a recurrence. The file for the reworked part is on Thingiverse (thing:2103488).

Remixed and improved ducting skirt, note the zip-tie on the right
    With that issue corrected, I designed some custom brackets to use a couple of spare 608zz bearings and the MK8's old idler bearing as pulleys. Other parts use were some old washers and pipe fittings from the workshop junk bin for a counter weight, a roughly 30cm piece of 1/4-inch steel rod for the main shaft across the top, a 1.5m length of thin rope/string, and about 30 zip-ties. I also added some temporary loops to the carriages allow using some zip-ties to hold the extruder in place while I installed the upper pulleys.

Pulley bearings, 1/4-inch shaft and part of the counterweight
Using the cable to loosely suspend the extruder during install
Temporary anchor for zip-ties
      Initially, I had thought to try running with just zip-ties holding the extruder block to each of the carriages, but that proved unworkable due to the zip-ties restricting the range of motion. The basic idea of suspending from the carriages would probably work if you used some form of elastic for the cables, but that still leaves a 400-gram weight sitting in the middle of the frame, so it would definitely lower the maximum attainable speed.

Initial configuration idea, doesn't work with rigid cables
Initial Z-tower pulley mount 
Upper pulleys 2/3 installed
    As you can see, I'd initially thought to use just the zip-ties to hold things in place, but that resulted in some strange glitches during homing, so I switched to the full counterweight option. After I'd installed the first couple of pulleys, I realized that the counterweight would hit the back of the z-tower carriage, so I designed a short arm with a 608zz on the end to act as a spacer. Other hardware used in the spacer arm was 3 M5x35mm bolts, 4 M5 nuts, and 1 M5x10mm bolt.

Spacer arm fully assembled
Spacer arm fully installed just below the top triangle
     As for the counterweight, I just used a small scale to measure the approximate weight of the extruder assembly, roughly 395 grams, then found a combination of old washers and stuff that was reasonably close to that weight to use for the counterweight, ended up at 405 grams, then tied the lot to the end of the string/rope. As for the print quality, I still need to retune the retraction settings, but it's a drastic improvement over the original configuration, with a much finer surface finish. Here's a couple of #3DBenchy prints for comparison, the Green one is from the filament comparison post with the original configuration, the gold one is done with the new configuration.

#3DBenchy 32-bit on the left, 8-bit on the right