Showing posts with label 3D printing. Show all posts

Tuesday, 21 June 2022

Upgrading to E3D Revo

Ender 3 undergoing upgrades

    Over the last year and a bit, I've been involved in beta-testing E3D's new Revo series hot-end, this is the process of upgrading my two mainline printers to run on it. One is getting my final beta hot-end, the other is getting a Revo6 I won in one of the contests E3D was running earlier this year.


Revo Micro on Voron Afterburner mount


    My Ender 3 got the beta Revo Micro, mostly since it was due for an overhaul anyway. Mount is the Voron Afterburner AB-BN variant, mostly since that was the only version that had proper support for the Revo Micro heat-sink in February, the current Stealth Burner had yet to be released at that point. Installation was fairly straightforward, I mostly followed the extruder assembly section in the Voron 2.4 manual, then it was just some calibration for the new tool-head and it was up and running.


#ShamrockE3D

     After getting it fired up, I was completely shocked by how good the print quality was, the image above is done with the 0.25mm nozzle, and aside from some light stringing, the print is basically perfect other than some ringing artifacts that are more to do with the printer frame than anything else. Incidentally, this print also won the random draw in #ShamrockE3D contest, netting a second Revo Six hot-end, so it was time to refit the Sculptor.


Revo Six on Bear Extruder

     The Sculptor had been overdue for a rebuild on its tool-head for about 6-months now, so I decided to make the conversion over to using the BearEXXA project, the same as what I'd fitted the Mendel90 with last year. Once the new printed parts where assembled, the Revo Six was a snap-in upgrade, it fits the old V6 mount design perfectly. One thing that I changed from normal assembly was adding a length of M3 rod-stock to extend the x-axis cable management tail, mainly to protect the Revo electrical quick connects, the Molex Micro-Fit 3 connectors are a known weak-point for stress failures if bent by gantry movement. The other tweak I made was installing BearEXXA Delta P v2 Fanduct, mainly due to the BearEXXA stock ducting being rather overdue for an update.


Revo 6 with Delta-P ducting

     Once I'd gotten the updates fully dialed in, the jump in quality was frankly night and day, probably a combination of the high-performance heat-break on the Revo systems along with substantial upgrades to the part-cooling setup on both printers. And with the new high-flow and hardened nozzle-cores that have just been announced, I'm looking forward to years worth of fantastic prints out of both machines.


Ender 3 on left, Sculptor on right

Tuesday, 12 May 2020

Design Study: Castor wheels from scratch

PLA Wheel
      While working on another workspace upgrade project, I decided to try making my own castor wheels from scratch using some leftover bearings that were floating around in the parts bin. I started off from the known dimensions the castors that are on the bottom of my main workbench, about 1.5 inch tall, and the specs of the 625 bearings that I was planning to use.


Castor wheel parts version 1
     A bit of drafting in Fusion 360 ended up with the version 1 parts, they worked fairly well once assembled since I've done rotating parts with 625 bearings before, but they weren't rotating around the vertical pivot like I was expecting them to when turning, so what was going on? 

Castor wheel mounts version 3
     I pulled up some example of high-end castor wheels online and quickly found the two issues with my design that were causing the rotation to jam under load. First up is that commercial castors actually have the centre of mass/vertical rotation shaft centred over the outermost 25% of the wheel rim area. This means that the wheel is constantly trying and failing to escape from under the load, manifesting as the sideways force that makes the wheels rotate to the point of least resistance relative to where you're trying to move them. 

Castor wheel version 3 with bearing collar installed
     The second detail is a simple mechanical part choice to make sure the wheels don't bind or stick under the load they're rated for, a simple ring of ball bearings around the vertical shaft between the wheel bracket and mounting plate. It's sort of a knock-off 'thrust bearing' more than anything else, so I drew some modifications into the parts to create a 3D printable version for testing and light load applications. Current plans are to use these for a small storage cart for around my workshop, so more to come later this summer.

Finished castor wheel version 3

Monday, 30 September 2019

Upgrading the Ender 3: Bond-tech gears, Bed Leveling Knobs and Part Fans

Ender 3 as currently configured
     After 6 months of using the Ender 3 in stock configuration I ran into a few areas that were showing signs of failing. So I thought I'd do a couple upgrades in the process of fixing them. Three key areas that were showing issues were the bed-springs, extruder idler arm, bed surface, and part-fan duct, so I picked out some upgrades for them.


1.75 mm Genuine BondTech drive gear kit.
    As the extruder is one of the highest wear parts on a 3D printer, any breakdown there is going to show up instantly in the printed parts. So I opted to upgrade to some BondTech drive gears with the original motor-end result is that I'm now able to print flexible filament without issue and haven't had a jam due to chewed up filament since. The housing is a PLA version of the official STL files from BondTech's website. They're surprisingly easy to print with an FDM machine-some slight supports in a couple minor areas and on the idler/compression arm and that was it.

Extruder Motor with BondTech mounting bracket
Fully assembled extruder block in use


   The next area that needed upgrading was my bed-levelling knobs. I came into the shop one morning to find one had spun clean off the bottom of the bed assembly from the vibrational force of normal operation. So I decided to install the same nyloc nuts solution that I've been using on my i3MK2 clone with some custom 3D printed replacement knobs.

Custom and Stock leveling knobs
New Leveling knobs fully installed, note M4 nyloc nut locking mounting screw
Flex-sure branded spring-steel build plate
    And speaking of the bed, I've been through a couple different printing substrates before settling on the current setup. I started with the official mag-bed upgrade after encountering bending issues with the strange flexible plate that came with the printer. The Creality mag-bed upgrade is much better than the starter plate, but the upper surface is far too rigid for practical use. Mine quickly developed cracks and started flaking apart with little bits stuck to prints. I was pleasantly surprised when a batch of spring steel plates that fit the Ender 3 build plate showed up on Amazon. It works perfectly with the magnet sheet from the official bed. I stuck some BuildTak on top and I've been using it ever since.

Radial part cooling fan (thing:3102082)
Electronics bay fan cover (thing: 3312856)
    And lastly are a couple upgrades from Thingiverse. First one is a 5015 radial part-cooling fan mount to replace the stock 4010 radial fan, (I've found that it gives about the same airflow with much lower noise levels, always a plus when working in the same space with the printer). The other upgrade is an elegant electronics bay intake cover, probably the simplest and most effective one I've found to date since it literally just snaps into place straight off the bed after printing. Combined, these two mods reduce the printer's noise level from a howl down to a minor background noise that is comfortable to work around.

Saturday, 31 August 2019

Workshop Upgrade: Electronics Workstation in a Box

Mystery Box
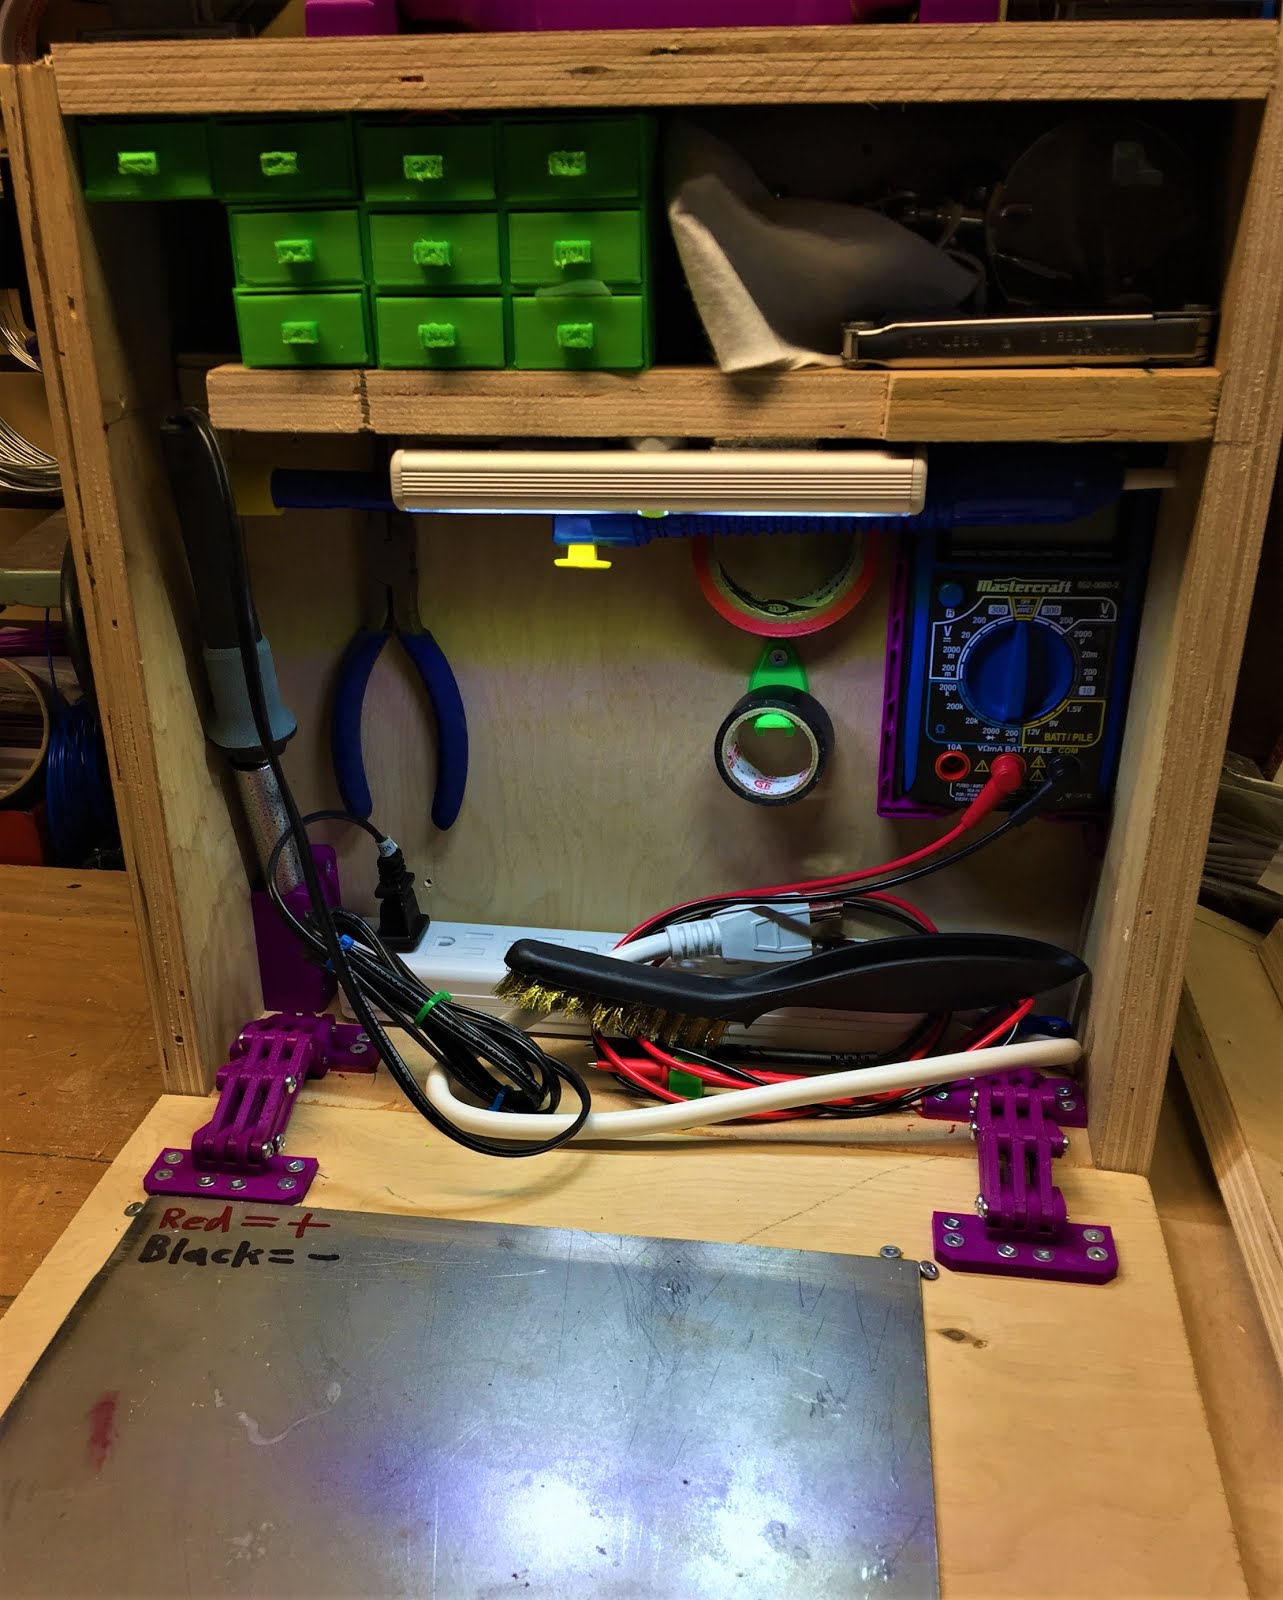
     After doing a bunch of Electronics work on a recent project and having to chase my tools for such work though four or five toolboxes, I thought it was time to build something dedicated for such projects. After doing some research, I found inspiration in this 'Portable Electronics Workstaion' over on Instructibles, in particular the fold-down lid/worktop, so that got integrated with the design.


Initial tool layout inside the box
    Constructing the actual box was fairly straightforward, it's just some leftover birch plywood that was in the woodrack, cut to size and screwed together with some 2 inch 'deck screws', nothing fancy but it's very sturdy and I can dismantle it with a screwdriver if I ever want to change something. The hinges are thing:2401035, and the latches are thing:2425378, both fairly nice designs that work quite well with the handle being custom work of my own. I'm using one of the leftover steel plates from the Mega Kossel's old form as a working surface, flipped over the back is plain steel, plenty sturdy enough to handle a stray iron or other hot tool, I've just used some spare screws in pairs at the corners to clamp it to the inside of the lid for easy storage.


Second iteration of interior layout
    As for what's in the box, I've got my larger multimeter in the right-hand corner, then some hooks for electrical tape (thing:2900008), my soldering iron in a custom stand on the left, power-bar to control the iron along the bottom, and some needle-nose pliers and a multi-tool on the back wall. Just below the shelf is my de-soldering pump and an LED 'work-light' type flashlight, then some custom drawers on half of the shelf above. The drawers are filled with small consumables like heat-shrink tubing and solder, stuff that gets used all the time in small amounts during projects.


Fume extractor parts
    On the safety side, I've got a cheap filter mask just above the iron, along with a custom built fume extractor on the upper shelf. Parts wise, the fume extractor is a 6025 12V fan that was leftover from the airfiltered enclosure build, along with a section of a commercial fume extractor filter cut down to fit. I created a custom enclosure in Fusion360 to fit the fan, then printed the parts out and bolted things together.


Fume extractor with fan installed, filter waiting for installation
    Power is fairly simple, I've got an adapter for the batteries for my power drill that takes a 2.5mm barrel jack, so I just fitted a spare plug to the fan's power leads, simple and easy to maintain. The actual filter is activated carbon with a custom holder, it's secured with some M3 bolts for ease of replacement whenever needed. 


Completed Fume extractor ready for use
     Overall, I'm happy with how this workstation/toolbox turned out, it should make any future soldering and electronics projects much easier and safer going forward.


Completed toolbox ready to use.

Friday, 17 May 2019

Household 3D Prints: Kitchen Knife Block

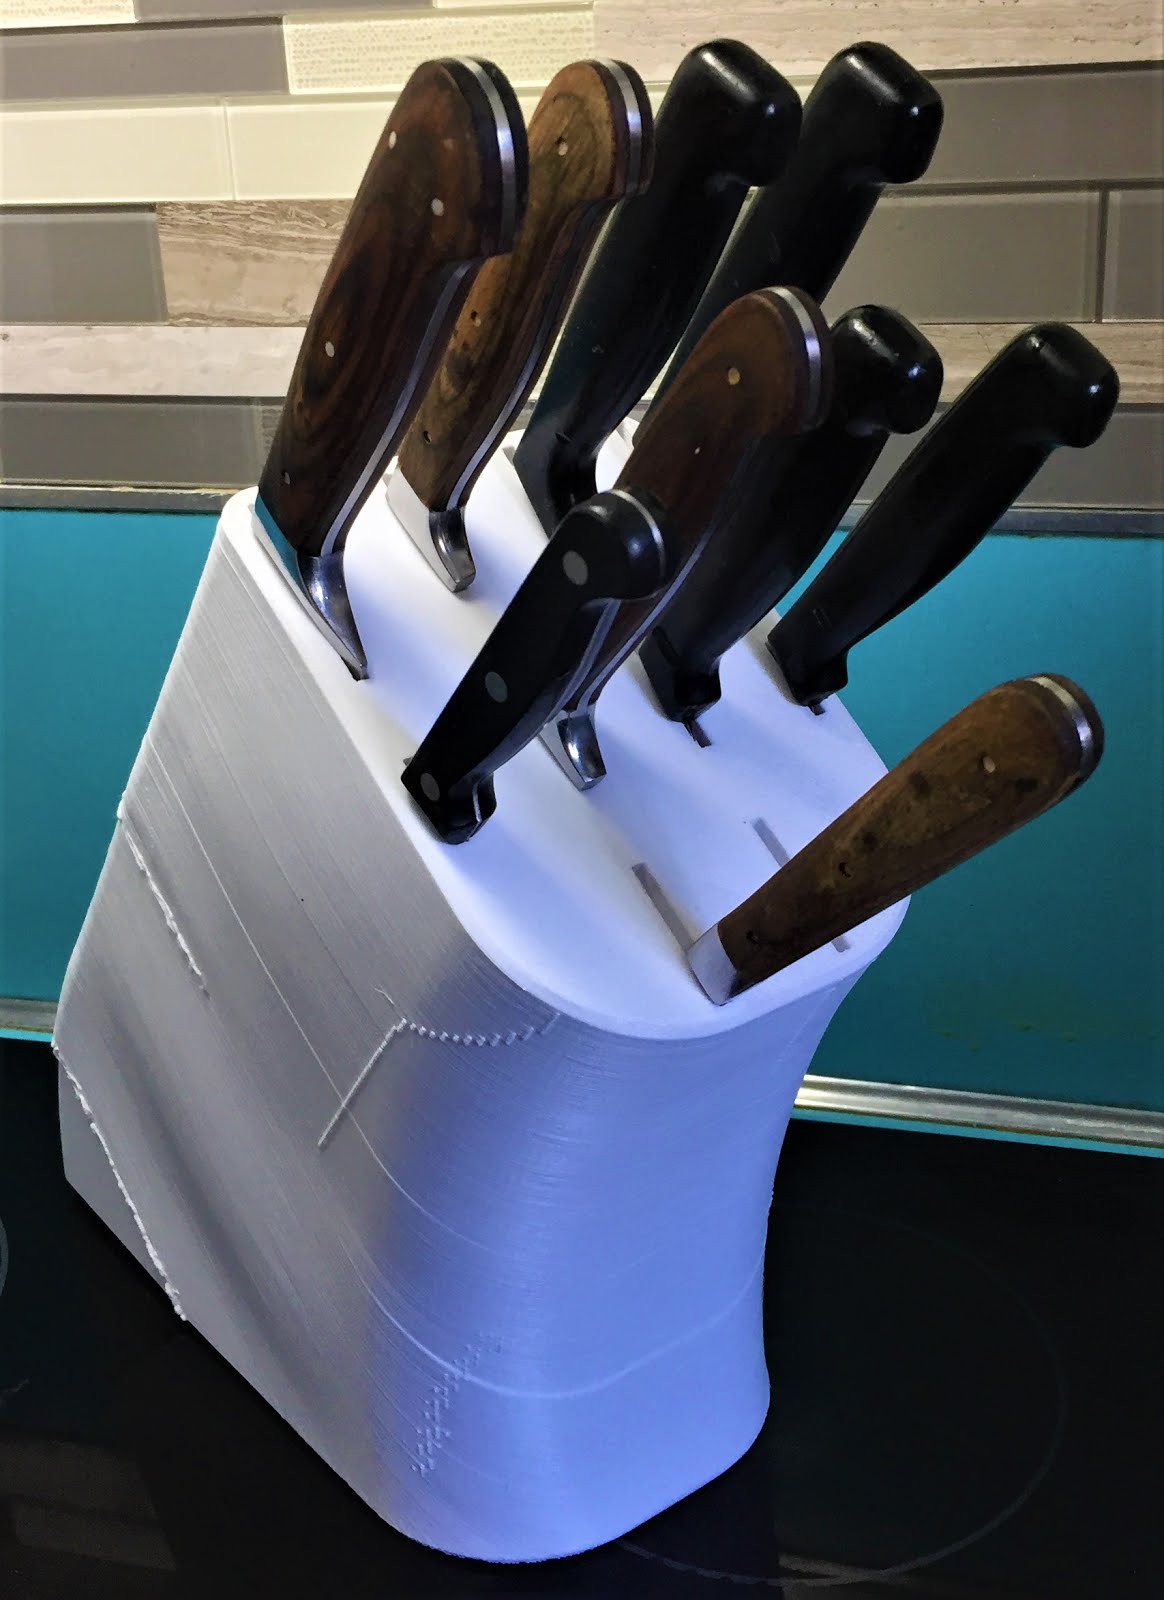
Kitchen Knife Block
    A few weeks ago I was washing some dishes in the kitchen and noticed the appalling state of the old wooden knife blocks, both were caked with dust and other debris, some seemed to have become ingrained into the finish, so I decided to 3D print a replacement that could actually hold all of the knives in a single block. The first step was looking at the full set to figure out what the basic sizes and styles were, came out as 2 cleavers, 5 regular ones, 2 pairing and 1 carving fork from a couple different sets. Most of them were fairly close in size for each type, so I took the length and width of the larges examples for each, then drew up a layout in Fusion 360.

Kitchen Knife Block in Fusion 360

     One issue that the old blocks had was it was difficult to access the handles for some of the knives due to the slots being tightly spaced, so I measured the handle widths and used double that dimension for the slot offset to fix this issue. Modelling the final form took about a day, then I loaded the model into my slicing program, ran the process with my standard settings and hit a snag. It was estimating over 1kg of PLA to print, and I didn't have any spools that big, so I decided to flip it on end and ditch the infill to see if that helped. It worked and got the weight down to 900g or so, so I turned it loose on the Mega Kossel with an almost full spool of PLA.

Finished Knife Block in use
    After almost 2 days of non-stop printing, it finished at 46 hours and an empty spool of PLA. I'd previously done a couple small prints with the reel, so I actually ended up doing the last 3 cm on the Ender 3 with another spool, then using my 3D pen to weld the 2 sections together. This thing is officially the single longest print I've ever done in the past 4 years, so I'm fairly pleased with how it turned out.

Tuesday, 30 October 2018

Household 3D printing round 3: Lampshades and Gardening

Greenhouse over planter box
     Been busy with helping wind-down the garden and cleaning up for the winter over the past couple of weeks, this included converting one of the beds into a mini-greenhouse. The core materials are 25-30 square meters of transparent plastic sheeting for the shell, a couple of 12 foot lengths of 1 inch plastic tubing and some 1/2 inch electrical conduit (EMT) off-cuts from the old Proteus build. Obviously this collection of components needs some way to connect everything, that's where 3D printing comes in with custom adapters and clamps.


Frame hoop anchor bracket with EMT  connector and plastic tubing.
      The frame is formed from the 1" plastic tubing with the EMT conduit used as corner posts that are anchored with connectors that I'd made for another project over the summer, basically a corner anchor to connect EMT to wood or other sheet material. Installation is fairly simple, two screws hold the bracket down to the planter box, then the EMT gets inserted the bracket and the plastic tube is slipped over the top to form the main arches. Cross bracing is provided by both the outer plastic sheeting and a cross-beam formed from some spare 1" tubing with more custom brackets.


Cross-beam connector in white PLA
     The outer plastic shell is held down by custom clips that clamp onto the 1" tubing in a 270° arc. So far it's stood up to a fairly intense rainstorm with minimal issues, a couple of the clips were overwhelmed by the wind and their position on the frame but it's easy to fix by printing slightly tighter ones for those spots.


Plastic sheet clamping clip in use
     The other project I've been working on is spiral lampshades using parametric design in Fusion 360, mainly as a way to learn more about the program and to replace a couple of ancient dust-trap shades that had gotten impossible to clean.

Twisty Lampshade fresh off the printer
    The form I settled on is a 7-sided cylinder, 25 cm tall and 19 cm in diameter. I started with a lofted form to create the slight curve to the sides and then hollowed it out to have 1.2mm thick sides for optimum light refraction. The material is basic white PLA without any heat-treatments or other modification after printing, and it's held up perfectly fine with an old incandescent bulb in the lamp.


Lamp with incandescent bulb and PLA shade.

Wednesday, 22 August 2018

Prop Replica Build: N7 Helmet from Mass Effect Trilogy

N7 Helmet from Mass Effect games
     Back in January, I upgraded the Mega Kossel with an E3D Volcano, and I've been running it with a 0.4mm nozzle, so it was time to tryout the 0.8mm and see what all the fuss was about. I've been a fan of the Mass Effect saga for a long time, so when I found Killonious's N7 Breather Helmet (thing:2152838) model on Thingiverse, I decided use it as a test for printing large and detailed objects with the big nozzle.


N7 Helmet parts
     Now, not all of the parts were done with the 0.8, the green and red parts were done with a standard 0.4mm nozzle, but all the transparent parts are printed with the 0.8mm nozzle and 0.4mm layers. Surface quality on the transparent parts is comparable to the standard nozzles, just slightly more apparent ridging from the layer lines. It does allow for a drastic reduction in print times, one of the sections printed with a 0.4mm nozzle took 4+ hours to print on its own, a similar sized part took only an hour with the 0.8mm nozzle, so for making large prints the Volcano is clearly the best option.
Assembled helmet with Dremel tool for friction welding
    Since most of the parts for this build are large and thin, my usual method of using 5-minute epoxy to join the parts would clearly make a big mess, so I pulled out my old model 275 dremel tool and chucked some scrap filament to start friction welding the parts instead. Friction welding can be done with either a 3D printing pen or a dremel with a section of filament loaded as the tool head, I'm using one of the smaller collets to get a firm grip on the 1.75mm filament. Once the filament is loaded, the basic technique is fairly similar to conventional welding in metal, creating small joints to hold the parts together first and them doing a second pass to finish the joint. Once that step was finished, it was time to paint this monster of an object.

Base coat of paint being applied
    As with any large prop, painting is the key to making it look like it's an actual object and not just a model. Since most of the shell was done in transparent PLA, the first step in painting was to base-coat the entire model to look like metal, I've used some silver acrylic mixed 3 to 1 with black to create a nice grey metal look before, so that's what got used for the base colour. After that, it was time to pull out the masking tape and start detailing things.

Masking applied to N7 logo area and waiting for paint to dry
     As you can see, this helmet has a lot of different sections that each need a contrasting colour to bring out the details, so it got masked and painted in stages starting from the top and working towards the back. Now, I'm not following the in-game colour layout properly, that would just be lots of blacks and greys, so this is more my personal idea of how the colours should look and I'm fairly happy with how it turned out.

N7 Helmet nearly finished
     One thing that I decided to try differently on this prop was to apply some varnish to seal the paint against scratching or any weathering that I add later, so I coated it in some spare Varathane that I had in the shop, it actually adds a nice shine that works well for this model, so that was an unexpected bonus.

N7 Helmet with finished paint pre-varnish
N7 Helmet with varnish applied

Friday, 2 March 2018

Magnetic Print Bed Surface on a Budget

Mega Kossel with magnetic build plate
     When I rebuilt my Mini Kossel into the Mega Kossel last August, I installed upgraded rod-arms that allow for a maximum build diameter of 250mm (9.84 in), and I've been using a 190mm (7.5 in) piece of glass topped with Buildtak as my bed for the past 6 months, so I've really been using only 58% of my theoretical build diameter. I'd looked at upgrading the bed surface with the Buildtak Flexplate system in the past, but the only circular option currently available is a 300mm (12 in) set, far to large for my frame and 220mm heat-bed. Thus, I started looking at options for building my own custom version.


10-inch pizza lifter from the local dollar store
     Concept wise, the Flexplate system is fairly straightforward, an adhesive sheet with magnets in it that sticks to the printer's heat-bed or build plate, topped with a spring steel sheet with some Buildtak material on one side. For my version, I'm using some steel pizza lifters that I found at the local dollar store in the cooking supplies section of all things, $4 each and a bit of drilling to remove the riveted-on handle and I've got some fairly flat surface plates.


Adhesive backed magnets assortment from Lee Valley Tools
     For the magnetic part of things, I'm using some 6mm rare-earth magnets that I salvaged from an old toy building set that I had floating around, but Lee Valley sells some 1/4" ones that are a fairly close match. 


Bed mounting bracket with magnets installed
Other side of bed mount with magnets
I've designed a variation of the mounting brackets for my heat-bed that puts 36 of them in a ring around the entire bed, massive overkill when it comes to this type of magnet but having the bed surface start drifting loose is the last thing you want on a 3D printer of any type.

Corner brackets waiting for magnets
Brackets mounted on Mega Kossel
     After printing the brackets, I used some 5-minute epoxy to fix the magnets in place, I've found that it does an excellent job of holding parts to PLA prints under most conditions.


Magnetic bed fully installed on the Mega Kossel
     I've been using this bed configuration for the past 2 weeks already and it works quite well. This particular implementation is specific to the Mega Kossel, but if I was going to install something like this on an i3 style machine, I'd make custom brackets that put the magnets in a line along the front and back edges of the bed, then use a slightly oversize sheet of steel for the bed topping plate.