Saturday, 8 October 2016

Delta 3D printer calibration the easy way

Micro Kossel and Mini Kossel
     As most readers will probably have noticed, I use delta mechanics on my 3D printers, they're fun to build, but a pain to get working perfectly. The cause of this difficulty is largely down to the calibration or getting the firmware's model of the machine to match reality. I'm going to demonstrate how to use some simple tools that make this process easy and straightforward.
Escher 3D Delta Calibration Wizard
     The tools I use for calibration are quite simple: a piece of standard printer paper, a laptop, the 3D printer, and the online web calculator created by Escher 3D (Calculator is here). You'll also need a program to control the printer's movements manually, such as Pronterface or its counterpart Repetier-host, I'll be using Pronterface, but all of this is very similar in Repetier as well. If your delta printer has 32-bit electronics (Smoothieboard, Duet variants, etc.) you'll want to log onto the web interface instead.
Pronterface waiting to connect to a printer
     First thing to do is connect your delta to your computer using the usb port, open Pronterface and hit the port button, this tells pronterface to check which port the printer is connected to, usually COM3 or COM4, and then hit the Connect button to link to the printer's electronics.
Pronterface after Connecting to the Printer
     Next, look at the console output on the right, listed near the bottom of the initial connection info will be some of your printer's current calibration data, how much varies depending on which firmware type/version you're using, I'm using the master branch of Rich Cattell's Marlin fork, simply because it implements a very comprehensive model of delta motion mechanics, which simplifies calibration by allowing you to update all of the variables with a single gcode command. The current mainline Marlin uses a couple of different commands to accomplish the same thing, but this really only affects how you send the updated calibration data to your machine.
Parameters for the Micro Kossel entered into the Delta Wizard
     Now that we've connected to the printer, next step is to tell the web calculator what firmware you're using, along with the current calibration settings on the printer, most of this is fairly straightforward, the relevant info is easy to get in RC Marlin by entering 'M666 L' into the command line in Pronterface. In mainline Marlin, the command is 'M503', which dumps all of the current configuration data, along with what commands are used to change things. You might need to look up some of the codes on the RepRap wiki Gcode page. Once all of the relevant info is entered into the web calculator, click on the 'Suggest probe points' button and the grid of boxes below will fill with some numbers, these are points to probe the nozzle height errors on your printer.


    Now it's time to use the piece of paper to actually measure the differences between the firmware's settings and reality. This is a fairly simple routine, first put the piece of paper on the print bed over the spot you want to measure. Then click the 'Home all' button, red arrow in the screenshot below, to zero the printer's coordinate system. Next, use the command line interface, green box/arrow in the screenshot below, and input something like 'G1 X0 Y0 Z 20' and click 'send' or press enter.
Pronterface with key controls highlighted
     The printer should respond by moving the nozzle to 2 cm off the bed at the center point. The reason for sending the nozzle to a point above the bed is simply to avoid damaging the printer by telling it to put the nozzle below the bed, which can happen with an uncalibrated machine. Next, use the manual jog buttons, blue rectangle and arrows in the screenshot, to lower the nozzle down, 1 mm at a time, then 0.1 mm once it's close to the bed, until the nozzle is just touching the piece of paper. It should be possible to drag the paper around with 1 finger, if not, raise the nozzle by 0.1 mm until it is. Once you've got that set, send 'M114' to the printer, it'll respond with the exact current position of the nozzle, the number in the Z column is the nozzle height error and needs to be entered into the web calculator's rightmost column, on the line that corresponds to the point being measured. Now just repeat this process until all of the nozzle error's have been measured, then click on the 'Calculate' button below the point table.
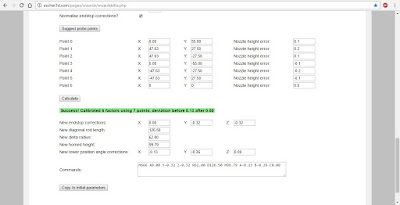
Finished Calibration Wizard
   A new line of text will appear, usually on a green background saying something like: "Success! Calibrated 6 factors using 7 points, deviation before 2.01 after 0.2". This is mostly irrelevant, only the deviation after value is of interest, the closer it is to 0 the closer to perfectly calibrated your machine is. The box at the very bottom will have a line or two of gcode, these are the commands to send to your printer to update the calibration. Simply click and drag over the text in the box until one of the lines is highlighted, then right-click and click 'copy' in the menu that pops up. Next in pronterface, right-click on the command line and click 'paste', this will copy the command from the web browser to the command line, and then click 'send'. Repeat if needed for the other lines of commands, then enter 'm500' and click 'send'. That saves the updated parameters to the printer's memory (EEPROM), otherwise it will just forget the updated calibration the next time you turn it off.
     Congratulations, you've successfully calibrated a delta 3D printer, now it's time to start making things with it.

No comments: