Monday, 25 March 2019

Beefing up a 3D printer: Mega Kossel 2.0

Mega Kossel, January 2019
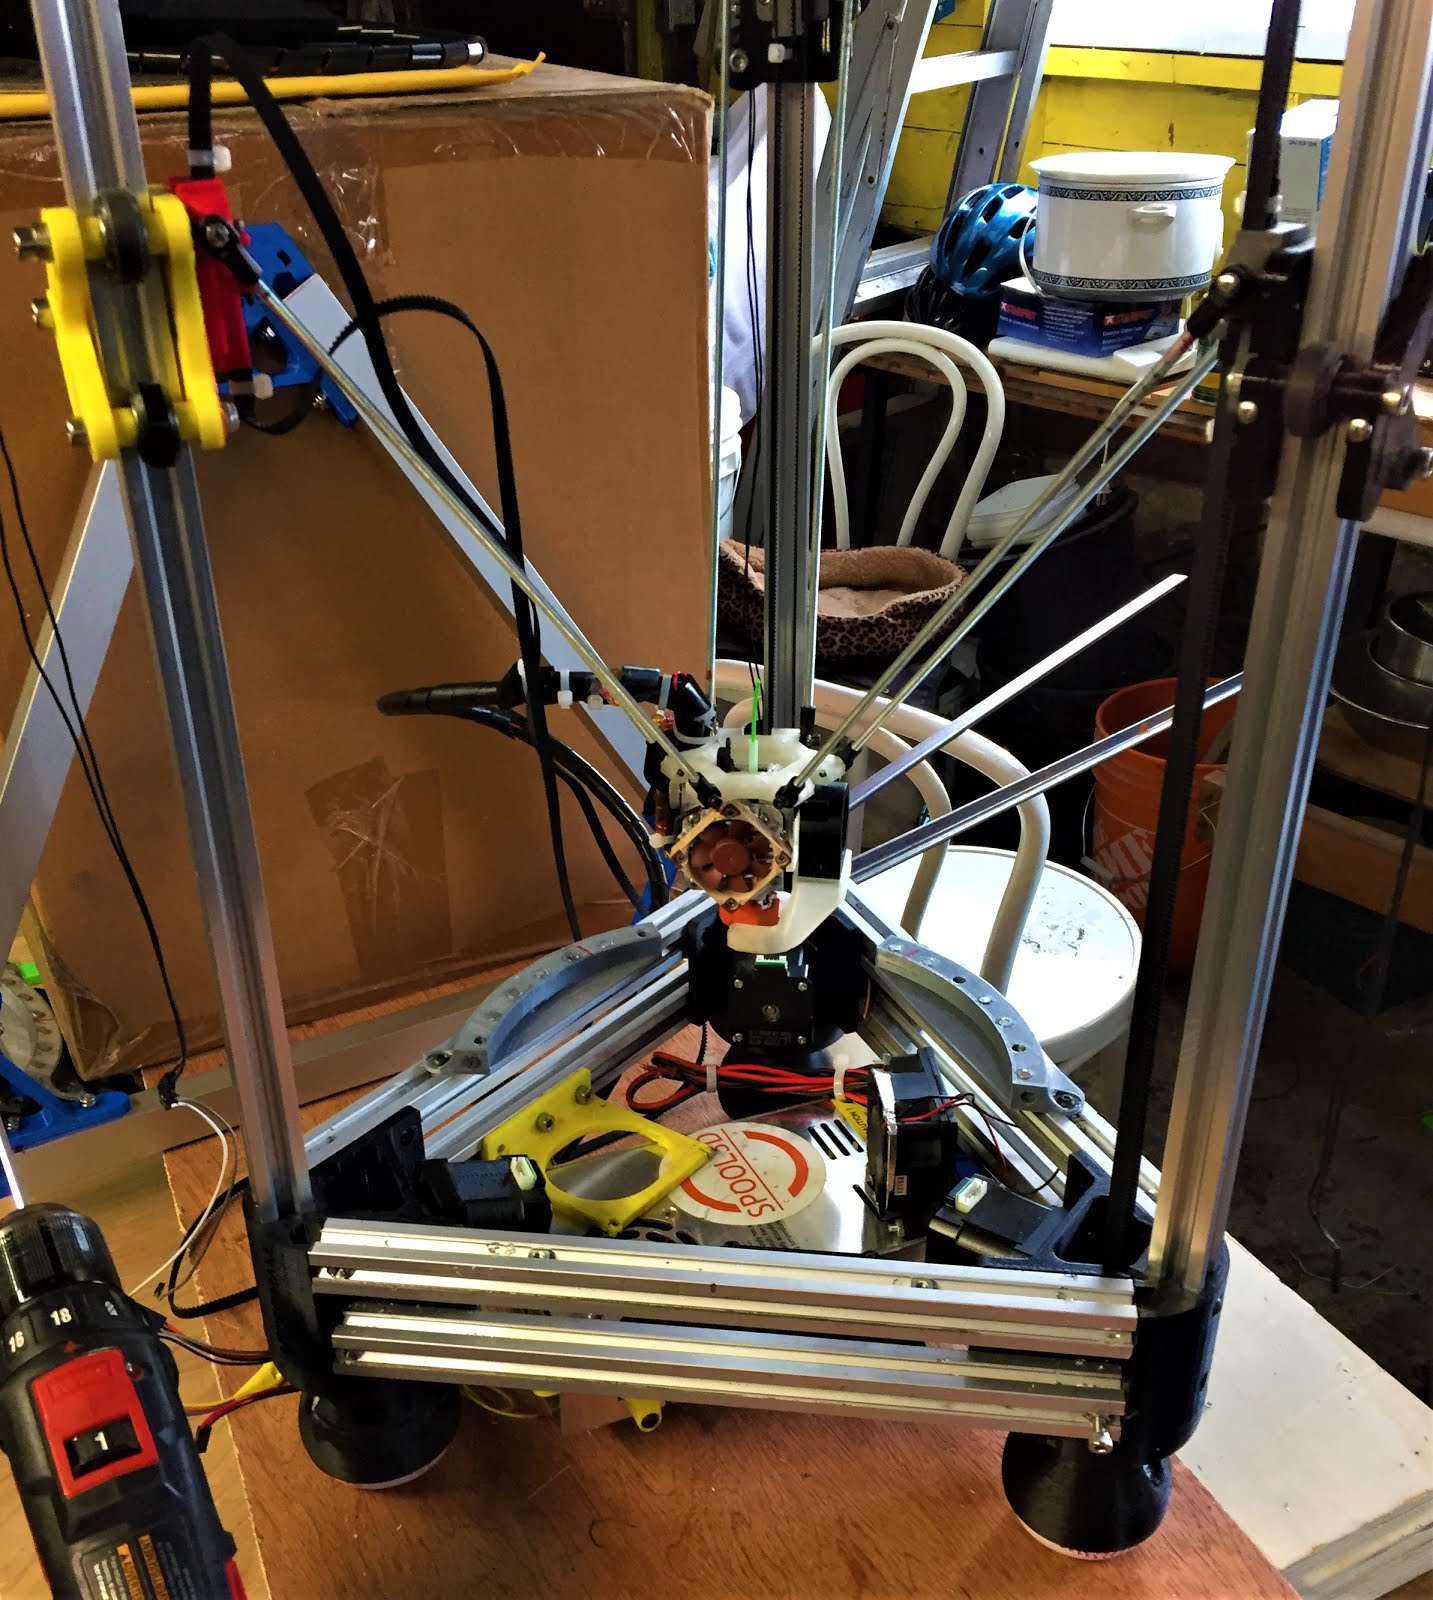
     After installing the Titan Aero on the Mega Kossel in January, I started to notice some twisting induced artifacts in the prints. Investigating them lead me back to the old corner brackets that were starting to show signs of cracking and fractures after almost 4 years of nearly non-stop usage, so I decided it was time to replace them. I was playing around with some numbers on an old copy of the Kossel frame calculator spreadsheet and found that my current rod-arms were long enough to use with the 300mm heat-bed that I'd originally bought for the Proteus, so I set about locating the materials for a refit/rebuild.


Mega Kossel 2.0 Corner brackets
     After finding that the local hardware store stocked 25mm (1 inch) aluminum square tubing, I decided to implement a trick that I'd seen online of having 3 towers on the corners of the frame instead of 1 to reduce or eliminate twisting issues, so I reworked the corner brackets to allow for external towers with auxiliary hard-points. The Mega was still functioning fairly well so I had it print off the replacements prior to dismantling it for rebuild.

Mega Kossel partially dismantled
     Since I was going to be replacing the print-bed with a larger model, I basically ended up pulling the electrical harness, v-slot towers and effector assembly off the old form of the Mega and scrapping the old triangles for parts. Once the green braces that were holding the towers in at the bottom were removed, the towers started flexing by almost 5 degrees over the frame height, one of the upper triangle brackets even shattered during removal, so clearly the frame was overdue for a full refit.

Mega Kossel 2.0 Upper Triangle

Mega Kossel 2.0 Lower Triangle under construction

     Assembling the upper and lower triangles was fairly simple from a structural perspective, but not so much from the electrical side of things. The 300mm heat-bed uses a 24V heater and the entire electrical harness was previously 12V, so I did some research into dual power systems and ultimately took a page out of DC42's Delta Build, specifically using an SSR relay to isolate the 12V and 24V power feeds. I had a spare 60W 12V power brick floating around from when I upgraded the Sculptor with a heated bed last fall, so I put it to use to power the motors, hot-end and control board on the new Mega 2.0 setup.

12V and 24V power supplies partially installed
    Having doubled up power supplies in the lower triangle does impose a certain amount of space restrictions, so I ended up spreading the control boards around the edges after sticking the power supplies in the centre. The Ramps/Re-ARM stack is mounted to a customized version of the 2020 bracket with the OctoPi module stuck on the opposite side, the SSR and voltage converter are mounted where there was space to fit them past the bundled wire leads. Not the neatest layout, but it gets the job done.

Lower Triangle structure completed
Installing the SSR and bed power lines
    Assembling the outer frame braces was a bit interesting, I made a couple minor errors that resulted in there being nearly zero clearance between the carriages on the motion towers and the structural brace towers beside them, resulting in binding issues the first time I tightened one corner down fully. The solution was fairly simple, I just loosened the tower that was binding slightly, slipped some sandpaper into the gap, the slowly tightened the tower back up while rubbing the carriage on the sandpaper. The resulting gap was more than enough to get the carriages running freely and reliably.

Mega Kossel 2/3 completed
    Once the last tower was fully mounted, it was just left to run the electronics through motion tests to ensure that everything was connected to the proper interface. I did catch a rather funny issue that would have made everything print mirrored in one axis but that was the worst of the issues, so I promptly put it to full use on a couple of minor projects to test the quality of the prints before putting it to work.

Mega Kossel 2.0 Completed

Friday, 25 January 2019

3D Printer Kit review: Creality Ender 3

Mystery Box
     New year, new printer in the workshop. Over the 2018 holiday season, I purchased a Creality Ender 3, so this is my mini-review of what's in the box and my experience using it to date. On first getting the box, it comes with just the shipping label stuck to the outside of the printer's box, so it's clearly marked as to the contents, it weighs about 6 kg at a rough guess, so be ready for a large and heavy package.


Interior of shipping box with top foam removed
    Opening the box reveals that much of the interior is packed with this grey plastic 'foam', quiet dense and sturdy. Unpacking revealed that all parts were securely nested in fitted holes, wrapped in cling film for the extrusions, and in multiple bags for the smaller parts.


Gantry parts fresh out of the box

Ender 3 base and Power supply freshly unpacked

     The printer is about half built straight out of the box, all the electrical systems are pre-installed and it's mostly just a matter of following the instruction sheet that's at the top of the box to get it fully assembled. I would recommend plugging the included microSD card into a computer, there's an animated video clip on it that goes through the entire build process step by step, it helps clarify a couple of points in the printed instructions. I did make a couple minor changes to the printer during assembly, mostly optimizations that the user community has come up with over the past year or so. 


Part cooling fan ducts, stock on the left, thing:3079610 on the right
     Probably the single most crucial change I made was to replace the stock part-fan ducting with thing:3079610, a 360 printed duct that puts the air where it's needed and not into the side of the heater block like the original will. I've been down the road of part-fans blasting the heater block on the Sculptor i3MK3 variant ducting, once is quite enough for that issue. This silly piece of plastic is probably why early versions of the Ender 3 shipped with the firmware thermal watchdog disabled, a problem that's apparently been solved on the one I received since a cold snap a couple of days after assembly set off the 'Min-Temp' error code.


thing:3303879 installed backwards
thing:2934313 installed
     Other than the part duct, the other changes were mostly minor optimizations, a cover for the milled slot in the base that the electrical bundle runs through (thing:2934313), and one of the many side-mount adapters for the stock spool holder (thing:3303879). But aside from those, I assembled the printer as designed and set about testing it.


Assembled Ender 3 almost ready to print
     After a bit of research turned up that Cura was the best slicer option for the Ender 3, I loaded up Cura 3.6 and discovered that it has a perfectly tuned profile for the Ender 3 baked right into the default preset package. Overall print quality is quite good, I've still got some slight nozzle drool issue, but I'm fairly sure that's just the PLA that I'm using. One issue that I found with the default 'Fiberboard' bed surface plate is that it warps under the stress of large surface prints, this lead to a couple of layer shift incidents during a long print, so I sourced the magnetic bed that's included on the 'Pro' version to try instead.

Early test print with default 'fiberboard' showing bending issue.

Ender 3 Magnetic Bed Sheet freshly installed.
     Once switched over to the magnetic version of the build plate, it's been fantastic performance all the way. I'd definitely recommend this printer to anyone who is just getting started with 3D printing, the quality and performance can't be beat at this price point.

Ender 3

Tuesday, 1 January 2019

Mega Kossel Upgrade: Direct Drive Effector with Titan Aero

Titan Aero Heat Sink
     Happy New Year! Over December 2018 I was experimenting with flexible filament, 90A TPE specifically, and ran into issues with running it on the Mega Kossel, so I decided to upgrade the extruder to full direct drive to correct the issue. I've had an old Titan clone in my parts bin since 2016, so the logical route to go was upgrading to the E3D Titan Aero with a pancake stepper motor.


Motor and Titan body mounted to modified Ultibots effector
     While I was waiting for the parts to arrive I started looking for an effector design to mount it on. The Ultibots D300 series design files turned out to have what I needed, but it was meant for some specialized type of rod-arm joint. Pulling the source files into Fusion 360 made it easy to customize both the effector and part-cooling duct. The remixed files are on Thingiverse (thing:3321195).


Titan Aero Volcano 90% installed
    Once the effector was sorted out, it was simply a matter of following the Titan assembly instructions to get it mounted and mostly assembled. Getting the drive gear in is probably the hardest part, it kind of has to be slid in sideways before the motor is installed, I ended up using the screw that connects the motor and extruder body to hold the body in place during that step. The idler arm is the other tricky bit, you need to slide it into its slot before installing the motor, otherwise it's a pain to mount, I ended up sliding it in at an angle and snapping it over the end of the motor shaft, not the best way to mount that bit.


Cooling fans installed, Noctua 4010 on the left, 40x40 radial on the right
    With the mechanical side of stuff assembled, it was time to mount the fans and sort out the electrical side of things. For the main heat-sink fan, I decided to get one of the much vaunted Noctua fans to see what all the fuss was about. The difference going from a 3010 axial fan for the heat-sink to the Noctua is instantly noticeable on initial power up, the 30mm fan was loud enough that I could always tell if the printer was on when in the workshop, the Noctua is completely silent by comparison, I can't even hear it unless I'm right next to the effector to clean the nozzle, so I'm probably going to replace all my constant on fans with them over time. Installing the part fan is slightly odd, there is one short screw to connect the fan duct to the effector that goes in first, then the fan gets slotted in and bolted down, the top hole needs a longer screw since it doubles as the second connector to the effector.


Wiring nest under the print-bed
    The last bit of installation was figuring out why the pancake NEMA17 wasn't working. Plugging in the working wire from the old extruder just resulted in the motor sitting there and making noise, so I thought one of the coils might be connected backwards or something. Digging into the documentation, it turns out that 25mm NEMA 17 motors have the coil pinouts reversed relative to longer models, so I had to use some jumper lines to build a cross-over cable to fix the issue, it's the black/grey/yellow/orange set of wires in the picture above.


Mega Kossel ready to print

Friday, 28 December 2018

Sculptor i3 Upgrade: Magnetic Sheet Topped Heated Bed

Sculptor i3MK2.3

     This fall has been completely crazy for weather, November was partially frozen solid with heavy frost everywhere. I spent the month upgrading the Sculptor with a heated build plate on the y-axis, something I'd planned for since June 2018. I had been using a 65W laptop power brick for it's electrical harness, but that's only enough to power the hot-end and motors, not all that plus a heated bed, so my first step was to upgrade to the same 350W power module that I've been using on the Mega Kossel. Actually installing the power block was simple and straightforward, mostly just removing the old connecting wires and installing the new ones for the upgraded power supply.


Upgraded Y-axis bed support plate on Sculptor
     As for installing the heated bed, it was a bit more involved since I didn't have a standard i3 bed support plate installed already, so mounting one of those was the first step. I got mine from Spool3D here in Canada, it's made of 3mm aluminum with cut-outs for both 3 and 4 bearing setups, so I just had to install the appropriate printed connector for the drive belt and it was almost ready to mount the bed. For holding the bearings on I decided to take a page out of the old i3MK2 build manual and use zip-ties, one at each end of the bearings, it's surprisingly sturdy when the bearings are locked into their slots like that. Bonus is this form of mounting allows just enough flex to compensate for any slight misalignment that might get into the rails during re-installation.


Build Plate assembly with zip-ties
90W MK3 Heat-bed with Wanhao branding
       For the headed bed, I went with the classic MK3 PCB/Aluminum combo that most i3 variations are fitted with, in this case a pre-wired version that I'm fairly sure was meant as a spare part for Wanhao Duplicator i3 models, again from Spool3D. For my purposes, having the wiring pre-installed is one less step to sort out. I only needed to connect them to the control board and the electrical side of things is finished. For mounting screws I happened to have some countersunk head M3s in the parts bin, so the bed got reamed out to accept them.

M3 bolt with Countersink
Magnetic surface sheet kit
    For the actual working surface, I picked up the Wanhao Duplicator i3 Magnetic Sheet kit since I've been interested to see how one of the 'buildtak clone with magnet sheet backing' systems actually worked in practice. What's included is a sheet of thin, mirror polished steel with coated with adhesive on one side and a sheet of build surface material backed with what looks like an overgrown fridge magnet at first glance. Actually installing the system is fairly simple, just peel off the backing from the steel and stick it down to the build-plate like you would with regular sticker-sheet, then there's a protective blue film that needs to come off the front. And finally it's just align and drop on the magnet sheet to finish off installation.

Fully installed heat-bed with Magnetic surface kit
    After using it for 2 months, I can safely say that this kind of magnetic mount has become my absolute favourite, it has all the ease of removal that the spring-steel based ones are supposed to have with much simpler installation. I've tested it at upto 60C on a regular basis and it's held up nicely so far, I've only managed to put some minor cosmetic scratches on it from the nozzle during leveling, it's flexible enough that even the most stubbornly stuck bits of PLA can be removed without tools, just bend it at the right point and they come straight off, much safer than the sharp-edged scrapers conventional beds require.

Finished Sculptor i3MK2.3 with new heat-bed installed
     Overall, I'm happy with how the heated bed update has worked out, it's certainly proven perfect for running in cold weather, cranked up to 60°C it holds PLA  and TPE filaments down just fine even with the ambient temperature hovering around -5°C. 

Tuesday, 30 October 2018

Household 3D printing round 3: Lampshades and Gardening

Greenhouse over planter box
     Been busy with helping wind-down the garden and cleaning up for the winter over the past couple of weeks, this included converting one of the beds into a mini-greenhouse. The core materials are 25-30 square meters of transparent plastic sheeting for the shell, a couple of 12 foot lengths of 1 inch plastic tubing and some 1/2 inch electrical conduit (EMT) off-cuts from the old Proteus build. Obviously this collection of components needs some way to connect everything, that's where 3D printing comes in with custom adapters and clamps.


Frame hoop anchor bracket with EMT  connector and plastic tubing.
      The frame is formed from the 1" plastic tubing with the EMT conduit used as corner posts that are anchored with connectors that I'd made for another project over the summer, basically a corner anchor to connect EMT to wood or other sheet material. Installation is fairly simple, two screws hold the bracket down to the planter box, then the EMT gets inserted the bracket and the plastic tube is slipped over the top to form the main arches. Cross bracing is provided by both the outer plastic sheeting and a cross-beam formed from some spare 1" tubing with more custom brackets.


Cross-beam connector in white PLA
     The outer plastic shell is held down by custom clips that clamp onto the 1" tubing in a 270° arc. So far it's stood up to a fairly intense rainstorm with minimal issues, a couple of the clips were overwhelmed by the wind and their position on the frame but it's easy to fix by printing slightly tighter ones for those spots.


Plastic sheet clamping clip in use
     The other project I've been working on is spiral lampshades using parametric design in Fusion 360, mainly as a way to learn more about the program and to replace a couple of ancient dust-trap shades that had gotten impossible to clean.

Twisty Lampshade fresh off the printer
    The form I settled on is a 7-sided cylinder, 25 cm tall and 19 cm in diameter. I started with a lofted form to create the slight curve to the sides and then hollowed it out to have 1.2mm thick sides for optimum light refraction. The material is basic white PLA without any heat-treatments or other modification after printing, and it's held up perfectly fine with an old incandescent bulb in the lamp.


Lamp with incandescent bulb and PLA shade.

Wednesday, 22 August 2018

Prop Replica Build: N7 Helmet from Mass Effect Trilogy

N7 Helmet from Mass Effect games
     Back in January, I upgraded the Mega Kossel with an E3D Volcano, and I've been running it with a 0.4mm nozzle, so it was time to tryout the 0.8mm and see what all the fuss was about. I've been a fan of the Mass Effect saga for a long time, so when I found Killonious's N7 Breather Helmet (thing:2152838) model on Thingiverse, I decided use it as a test for printing large and detailed objects with the big nozzle.


N7 Helmet parts
     Now, not all of the parts were done with the 0.8, the green and red parts were done with a standard 0.4mm nozzle, but all the transparent parts are printed with the 0.8mm nozzle and 0.4mm layers. Surface quality on the transparent parts is comparable to the standard nozzles, just slightly more apparent ridging from the layer lines. It does allow for a drastic reduction in print times, one of the sections printed with a 0.4mm nozzle took 4+ hours to print on its own, a similar sized part took only an hour with the 0.8mm nozzle, so for making large prints the Volcano is clearly the best option.
Assembled helmet with Dremel tool for friction welding
    Since most of the parts for this build are large and thin, my usual method of using 5-minute epoxy to join the parts would clearly make a big mess, so I pulled out my old model 275 dremel tool and chucked some scrap filament to start friction welding the parts instead. Friction welding can be done with either a 3D printing pen or a dremel with a section of filament loaded as the tool head, I'm using one of the smaller collets to get a firm grip on the 1.75mm filament. Once the filament is loaded, the basic technique is fairly similar to conventional welding in metal, creating small joints to hold the parts together first and them doing a second pass to finish the joint. Once that step was finished, it was time to paint this monster of an object.

Base coat of paint being applied
    As with any large prop, painting is the key to making it look like it's an actual object and not just a model. Since most of the shell was done in transparent PLA, the first step in painting was to base-coat the entire model to look like metal, I've used some silver acrylic mixed 3 to 1 with black to create a nice grey metal look before, so that's what got used for the base colour. After that, it was time to pull out the masking tape and start detailing things.

Masking applied to N7 logo area and waiting for paint to dry
     As you can see, this helmet has a lot of different sections that each need a contrasting colour to bring out the details, so it got masked and painted in stages starting from the top and working towards the back. Now, I'm not following the in-game colour layout properly, that would just be lots of blacks and greys, so this is more my personal idea of how the colours should look and I'm fairly happy with how it turned out.

N7 Helmet nearly finished
     One thing that I decided to try differently on this prop was to apply some varnish to seal the paint against scratching or any weathering that I add later, so I coated it in some spare Varathane that I had in the shop, it actually adds a nice shine that works well for this model, so that was an unexpected bonus.

N7 Helmet with finished paint pre-varnish
N7 Helmet with varnish applied

Monday, 23 July 2018

Designing Custom Lens Adaptors for Vintage Lenses and Modern Digital Cameras

Vintage Lenses with 3D printed adaptors
    Recently I was commissioned to examine a collection of vintage lenses to see if it was possible to make adaptors to mount them on a FujiFilm X-E2 digital camera. The lenses were quite varied, a pair of 16mm film camera lenses, a microscope lens, and Meyer-Optik 400mm telephoto lens.


Lens adaptor for Meyer-Optik 400mm lens

Meyer-Optik 400mm lens with adaptor attached
   The 16mm lenses were a bit different and required custom adaptor plates to link them directly to the camera's mounting ring, so I set about figuring out the dimensions and best way to print them.

Wide-angle 16mm lens with 3D printed adaptor
     The 16mm lens set consisted of a wide-angle lens and a more general telephoto lens that had a damaged mounting ring, so I designed its mounting plate to include some M3 set-screws to secure it.

16mm telephoto lens with 3D printed adaptor plate and set-screws
     Lastly, the microscope lens was the trickiest since it has no focusing mechanism at all, so it's adaptor plate had to serve that function instead by incorporating a screw thread between the inner and outer sections.

Microscope Lens with focusing adaptor
     After further refining my basic design ideas, I'm now offering some basic sizes for sale on Shapeways: